How to set up Google Ads conversion tracking in under 15 minutes (WooCommerce & GTM)
Setting up reliable conversion tracking is essential if you want to steer your Google Ads campaigns properly.
Without tracking, there is no way to know whether your ads are actually generating sales.
In this article I explain how to configure Google Ads conversion tracking in under 15 minutes, on an e-commerce site, using Google Tag Manager.
The method shown here is simple, quick and perfectly suited to WooCommerce stores (and it transfers to Shopify too).
What this tutorial sets out to do
- track every sale made on your e-commerce site
- feed those sales back into Google Ads
- measure the real performance of your advertising campaigns
⚠️ Important
This tutorial lets you count sales, but it does not yet let you calculate ROAS precisely (return on ad spend).
For that you will need an advanced e-commerce dataLayer, which will be the subject of a future tutorial.
The example used here
To illustrate this guide I am using the Passi’Jardinsite, an e-commerce store built on WordPress with WooCommerce.
The client sells Christmas trees online and wants to know how many sales actually come from his Google Ads campaigns.
Step 1 – Check that Google Tag Manager is installed
First of all, it is essential that Google Tag Manager is correctly installed on your site.
To get the GTM tags:
- Go to your Google Tag Manager account
- Click on your container ID
- Copy the two scripts provided:
- one to place in the
<head> - one to place in the
<body>
- one to place in the
These tags let you track what users do on your site (page views, clicks, purchases and so on).
👉 On WordPress (and with Divi in particular), the integration is done very simply through the theme settings.
Step 2 – Create the conversion action in Google Ads
Log in to your Google Adsaccount, then:
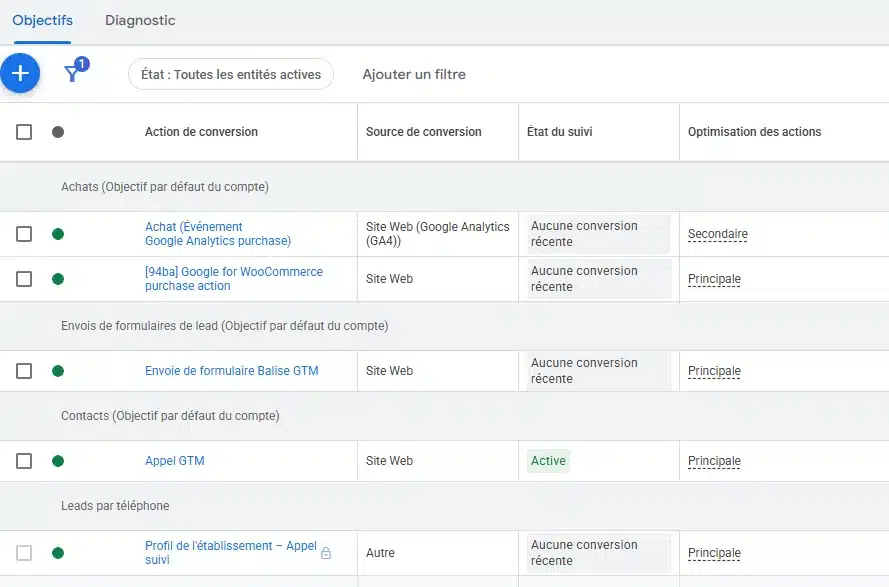
- Go to Goals
- Click on Summary
- Find or create the conversion action matching thepurchase

In the example, the conversion starts with a specific ID (“94…”, say).
As long as Google Tag Manager is not installed, the conversion shows as needs attention, which is perfectly normal.
Step 3 – Create the conversion tag in Google Tag Manager
Now go into Google Tag Manager :
What to do:
- Click on New tag
- Choose Tag configuration
- Select Google Ads – Conversion Tracking

You will need to fill in two essential fields:
- Conversion ID
- Conversion Label
To find them:
- Go back into Google Ads
- Open the conversion action concerned
- Click on Use Google Tag Manager
- Copy the two identifiers
Then paste them into the GTM tag configuration.
Once they are filled in, Google Tag Manager automatically recognises the associated Google Ads conversion.
Step 4 – Configure the conversion trigger
A conversion should only fire when a purchase has genuinely been completed.
To do that:
- Create a trigger of type Page View
- Select Some Page Views
On an e-commerce site, after a purchase the user is redirected to an order confirmation page (a thank-you page). On WooCommerce that page usually contains:
order-received- a unique order parameter (
?key=)
Together these confirm with certainty that a purchase has been made.
Step 5 – Test with a real purchase or a discount code
The best solution is still to test a real purchase. To avoid paying for nothing, though, it is worth creating a 100% discount code.
Enabling discount codes in WooCommerce:
- Go to WooCommerce settings
- Enable the option Enable coupons

Go to the Marketingtab, then click Add coupon :
- Percentage discount: 100 %
- Free shipping (if available)
- Usage limit (1 to 3 tests)
If your site has no free shipping (so you do not pay delivery costs during the test):
- Add a shipping zone
- Configure free shipping
- Tie it to a specific postcode (to be used for your tests)
Step 6 – Identify the order confirmation URL
Place a test order with:
- the discount code
- the postcode you configured
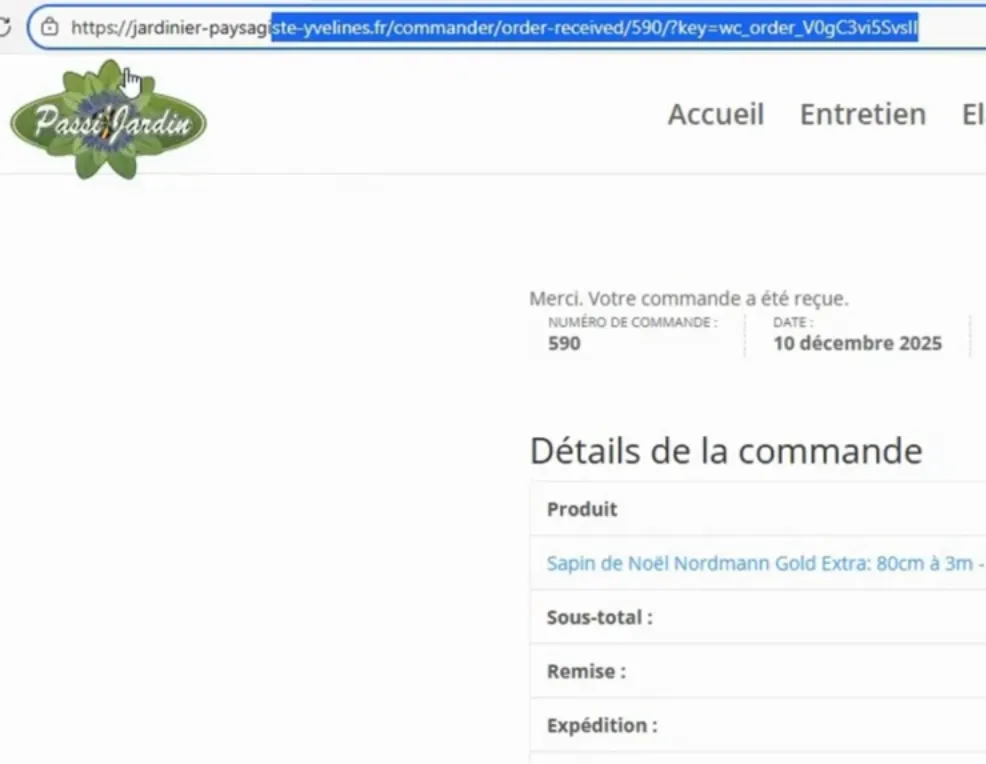
Once the order is confirmed, look at the page URL. The key elements to note are:
order / order-received- the part of the URL after the
?(the order key)
Step 7 – Finish the trigger in GTM
In Google Tag Manager, configure the trigger with two conditions :
- Page URL contains
order-received - Page URL contains
key=
This double condition avoids false positives and guarantees that the conversion only fires on a genuine order.
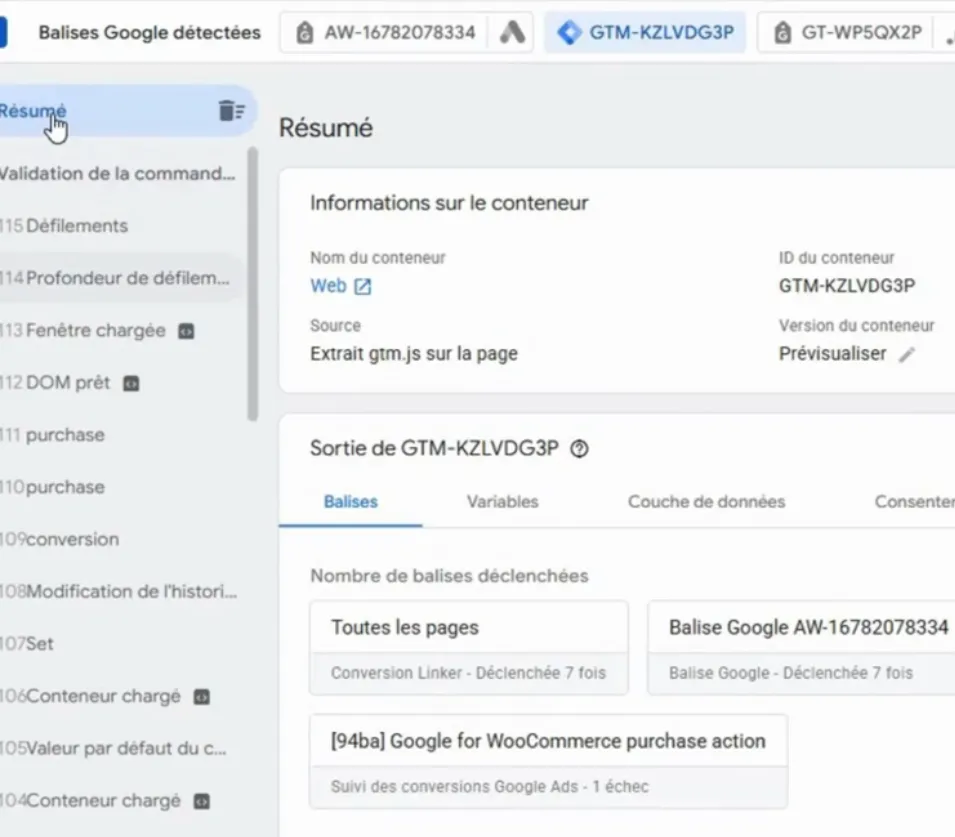
Step 8 – Test with Preview mode
Before publishing:
- Click on Preview in GTM
- Place another test order
- Open Tag Assistant
You should see:
- the Google Ads tag fired
- both URL conditions met
If so, the tracking is working correctly.
Step 9 – Publish and check in Google Ads
Once the test passes:
- Click Submit in Google Tag Manager
- Publish the configuration
All that is left is to generate sales and check that they come through in Google Ads.

Conclusion:
In under 15 minutes you can set up reliable conversion tracking for your Google Ads campaigns on WooCommerce. It is an essential step if you want to steer your performance and optimise your advertising spend.
In a future tutorial I will show you how to:
- feed back the revenue
- calculate a precise ROAS
- use an advanced e-commerce dataLayer
It is entirely possible to get excellent scores on Google PageSpeed Insights, even with a site that started out slow.
Written by
Nicolas Peter – founder of the agency Oli-via-net, certified expert in Google Ads, SEO and e-commerce tracking.